GeekOS之Project0
官方说明
The Assignment
Add code to the kernel to create a new kernel mode thread. The kernel mode thread should print out ”Hello from xxx” where xxx is your name. It should then call the keyboard input routine Wait For Key() repeatly (and echo each character entered) until the termination character (control-d) is entered.
Hints
- This project will not require much code to be written. However, it may take some time to get things set up and debugged.
- Execution of the GeekOS kernel begins in the Main() function in the source file src/geekos/main.c.
-
To start a new kernel mode thread you use the
Start_Kernel_Thread()function. Look at the
comments before the definition of this function in src/geekos/kthread.c.
文档给了很多提示,比如在你需要开启一个内核级线程,你需要函数Start_Kernel_Thread(),而这个函数就在文件src/geekos/kthread.c中,先不忙看Start_Kernel_Thread()这个函数,看看Main()函数都做了些什么。
1 2 3 4 5 6 7 8 9 10 11 12 13 14 15 16 17 18 19 20 21 22 23 24 25 26 27 28 29 | /* * Kernel C code entry point. * Initializes kernel subsystems, mounts filesystems, * and spawns init process. */void Main(struct Boot_Info* bootInfo){ Init_BSS(); Init_Screen(); Init_Mem(bootInfo); Init_CRC32(); Init_TSS(); Init_Interrupts(); Init_Scheduler(); Init_Traps(); Init_Timer(); Init_Keyboard(); Set_Current_Attr(ATTRIB(BLACK, GREEN|BRIGHT)); Print("Welcome to GeekOS!\n"); Set_Current_Attr(ATTRIB(BLACK, GRAY)); TODO("Start a kernel thread to echo pressed keys and print counts"); /* Now this thread is done. */ Exit(0);} |
从第一个函数开始,Init_BSS()
开始做点有意义的事
函数大概都分析完了,回到Project0给我们的任务让我们在屏幕上打印"Hello from xxx"(xxx就是你的名字?),完成之后还需要监听键盘,通过键盘输入字符并回显,然后用control-d结束键盘输入。Ok,目标已经很明确了。继续!
创建内核级线程并打印"Hello from xxx"
刚开始文档给的提示已经说明了创建内核级线程所需的函数---Start_Kernel_Thread(),在src/geekos/kthread.c里面找到改函数:
1 2 3 4 5 6 7 8 9 10 11 12 13 14 15 16 17 18 19 20 21 22 23 24 25 26 27 28 29 30 31 32 33 | /* * Start a kernel-mode-only thread, using given function as its body * and passing given argument as its parameter. Returns pointer * to the new thread if successful, null otherwise. * * startFunc - is the function to be called by the new thread * arg - is a paramter to pass to the new function * priority - the priority of this thread (use PRIORITY_NORMAL) for * most things * detached - use false for kernel threads */struct Kernel_Thread* Start_Kernel_Thread( Thread_Start_Func startFunc, ulong_t arg, int priority, bool detached ){ struct Kernel_Thread* kthread = Create_Thread(priority, detached); if (kthread != 0) { /* * Create the initial context for the thread to make * it schedulable. */ Setup_Kernel_Thread(kthread, startFunc, arg); /* Atomically put the thread on the run queue. */ Make_Runnable_Atomic(kthread); } return kthread;} |
有了这个家伙,办事儿就方便多了,废话不多说,上代码: 在main.c中添加一个你自己的函数,like this:
1 2 3 4 5 6 7 8 9 10 11 12 | /* * My first fuction for GeekOS,to print message in screen & listen keyboard as * Kernel-mode-only thread */void show_message (void){ Print ("Hello This is Lazymonkey's first message by GeekOS!\n"); while (1) { }} |
在Main()函数里面加一句:
1 | struct KThread *kthread = Start_Kernel_Thread (&show_message, 0, PRIORITY_NORMAL, false); |
编译运行,就可以看到屏幕上打印出了我们所需要的内容,当然,这才是Project0的一部分,接下来还需要监听键盘,输入字符并回显。go on!
监听键盘&回显字符
关于键盘的一切信息可以在keyboard.c里面看到,现在我们直接改代码,修改我们之前写的函数show_message()如下:
1 2 3 4 5 6 7 8 9 10 11 12 13 14 15 16 17 18 19 20 21 22 23 | /* * My first fuction for GeekOS,to print message in screen & listen keyboard as * Kernel-mode-only thread */void show_message (void){ Keycode key_listener; Print ("\e[32m%s\n", "Hello This is Lazymonkey's first message by GeekOS!"); Print ("\e[34m%s\n", "You can input anything by your fingers...^_^"); Print ("\e[31m%s\n", "Control-d can break your input"); while (1) { key_listener = Wait_For_Key (); if (!(key_listener & KEY_RELEASE_FLAG)) { if ((key_listener & KEY_CTRL_FLAG) && (key_listener & 0xFF) == 'd') { Print ("\e[0m\e[33m%s", "\nControl-d have down!\n"); break; } else Print ("\e[43m\e[35m\e[1m%c", key_listener); } }} |
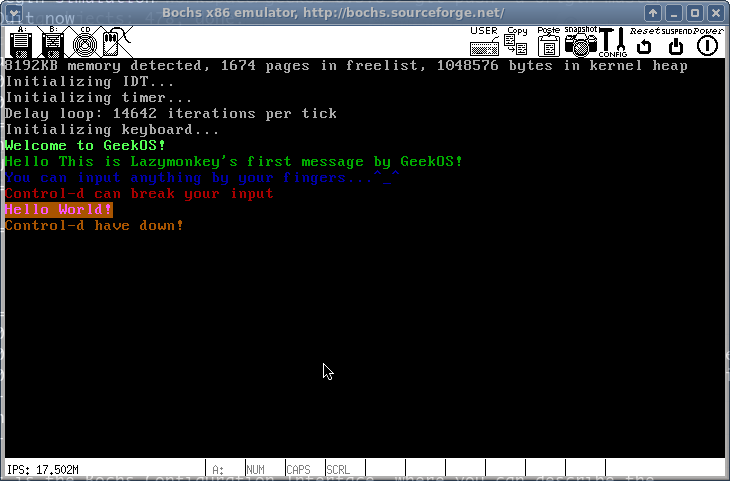
完成Project0后的最终效果。。。
ps:其实很早之前完成了几个Project,现在又拿过来看,温故而知新?:-D
 评论 (0)